|
for more information call: 440-667-7276 or |
|||
PAINTING LACE AND CRYSTAL |
|||
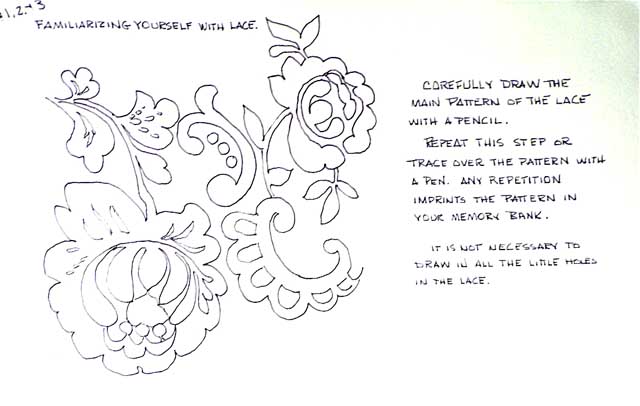
Master watercolor painting lace without photo realism. Select a very small portion of the lace and make a fairly detailed pencil sketch of it on my paper. Then I repeat this design in a looser manner as many times as needed to complete my still life. Place something dark beneath the lace so that you can see the pattern more clearly, then carefully draw the basic image of the lace. Then draw the repeated pattern, and repeat this procedure several times, your mind will have memorized the basic pattern. It is just like practicing the piano. Repeat, repeat, repeat, until your mind and fingers have it memorized. It is NOT necessary to draw in every little hole in the lace....just the main pattern. Do this on a piece of paper. When you have it memorized it is then time to draw it on your watercolor paper. The other details can be put in with a brush when you have begun to paint. Even then, it is not necessary to paint every little hole. Let the viewer's mind imagine what he is seeing. Click on this image to see the larger picture.
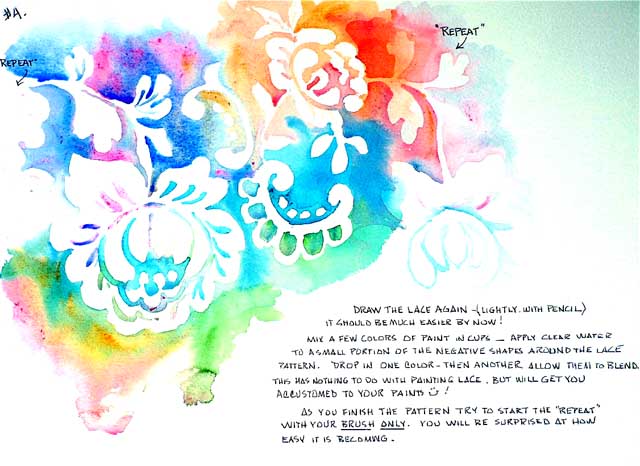
Once you have this design in your mind, it is time to paint. The viewer is never aware that you have any liberties with the pattern, and they are very impressed with your ability to do what looks like an intricate drawing or painting. They will never know if you have slightly changed the pattern. Now you can put this on your watercolor paper and begin to paint. I dare say, that you may not even have to draw it on the paper, but that you will have memorized the shapes just because you have drawn it enough times to know exactly where the negative shapes (background shapes in this case) are. Here I have taken some liberties with color. I carefully paint clear water in each negative space, then drop a color with the tip of my brush and let it flow into the wet area, trying not to let brush stokes show. If the area is not totally wet, you might have to help it along with the tip of your brush. In an adjoining space, I repeat the process, but might drop in another color, and with the brush, blend the two colors at their edges. This is only for dramatic effect. Perhaps you would prefer the same color in the background all over the painting. The choice is certainly yours. As you continue this process you might not use a pencil at all. And if you make a mistake, I doubt that anyone will notice. Just keep repeating the pattern as well as you can remember it. By this time you might even be able to see how it would look if it were folded. The pattern, like shadows in the landscape, will follow the flow of the fabric. Click on this image to see the larger picture.
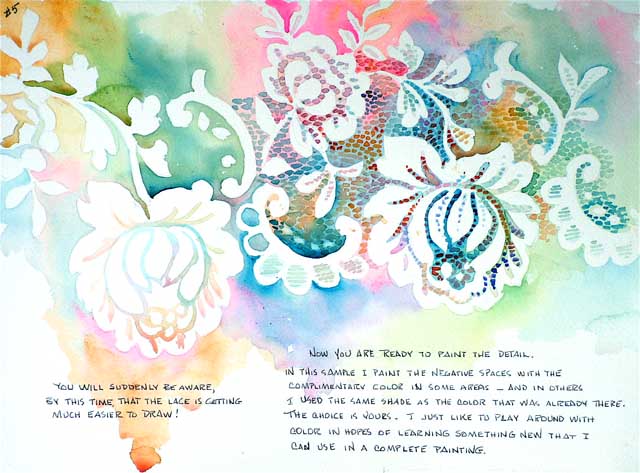
Probably the most difficult thing to learn when painting is how to determine negative shapes. It is in discovering this that an entire new possibility and challenge is presented to us as artists. When you get to this point in the painting, you can add further detail (the little holes in the lace). Don't make it such a difficult thing by counting the holes and trying to make them exact! Use either a 1/8" flat brush or a small round brush to make the holes. If they are square or rectangular in shape, the flat brush is appropriate. If they are more like little circles, the round brush is the one to use.
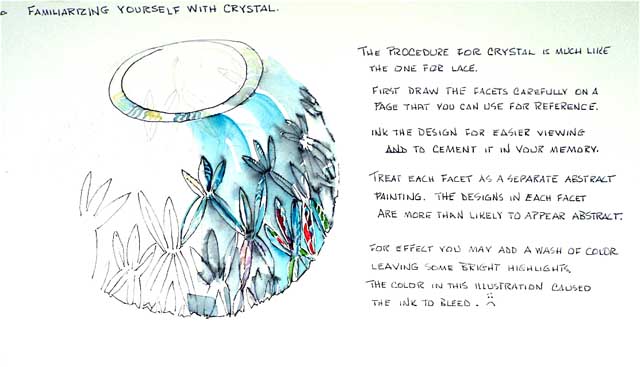
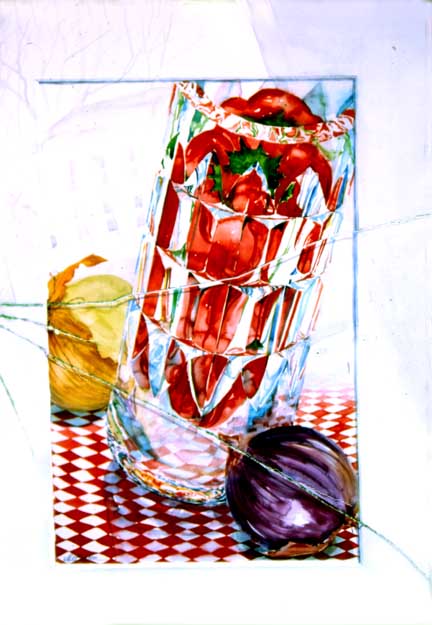
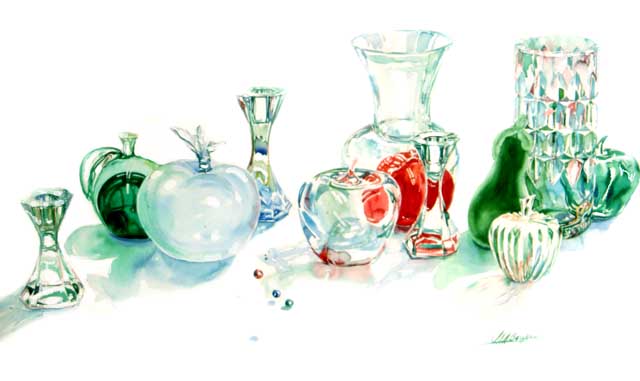
It is not necessary to paint every little hole. You can start with one area, and when you get to the edge of your paper, you can fade out the color of the holes so that you eye is on the focal point and not carried off the page by all the detail at the edges. The procedure for painting crystal is much the same....actually, exactly the same! However, with the crystal you might be seeing what is inside the crystal or what is beyond it, since it is totally transparent. It is those colors that will be determining what colors to use in the execution of the painting. I start by drawing the main design, then repeating it until I have memorized it. (If the crystal is very ornate, you can cheat by doing many little strokes in the direction of the design, changing colors frequently). But if the cut glass is a simple design, such as in this image, you must memorize the pattern. Treat each little facet as a separate painting. Don't panic by looking at the total image and frantically worrying about "how will I ever do this?" Next is a painting of a crystal vase with which I took some liberties. I put a large red pepper inside so that it would be a brilliant contrast to the glass. In each broad facet of the crystal I painted the red shape that I saw. One at a time....and they were all a bit different. Notice the light space between the facets. This is the light that you see at the edge of the cut. This also helps to define each facet of crystal. I entered this painting in a juried competition. It was accepted, and I was called by one of the committee workers to see if I would like to pick it up and have the glass replaced before the show opening. Oh, how I laughed. Painting smooth clear glass poses another problem. It does not have facets that you can treat as individual little paintings, so you must treat the whole, or concentrate on what is inside the glass, as that is the little painting that you must concentrate on.
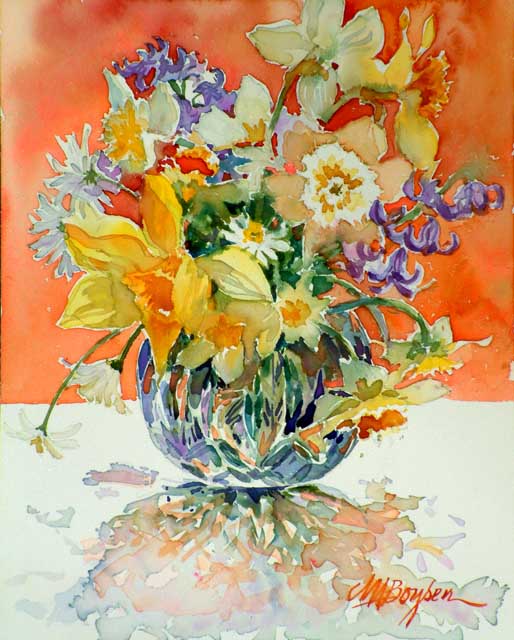
The following is a vase faceted vase that is loaded with flowers. Stems are in every direction in the water. It is a mish-mosh of greens, blues mingled with some of the colors of the flowers which are reflected in the glass. Even the shadow below has a repeat (in a lighter value) of the colors in the vase. SHADOWS ARE NOT GREY! They are every color of the rainbow! They also carry reflected light from the subject casting the shadows. That is another entire chapter!
Now, I hope you understand more about patterns found in lace, cut glass, and smooth crystal. It takes a bit of practice to get this right, but you can do it. All it takes is dedication to practice and the desire to succeed. Remember what it takes to get to Carnegie Hall. (practice, practice, practice)
|
|||
|
Send comments or
questions about the artwork to art@maboysen.com |
|||