Lesson 2:
By Mary Ann Boysen
No one told me how important the proper mixing of colors was. I discovered it a couple of years AFTER I had begun to learn to paint! Of course, as a beginner, I understand that you are anxious to produce a masterpiece, but be patient. That will come....and it will be much easier if you take the time to do a little homework. |
Related topics:
Intensity Scale
Color Harmony
|
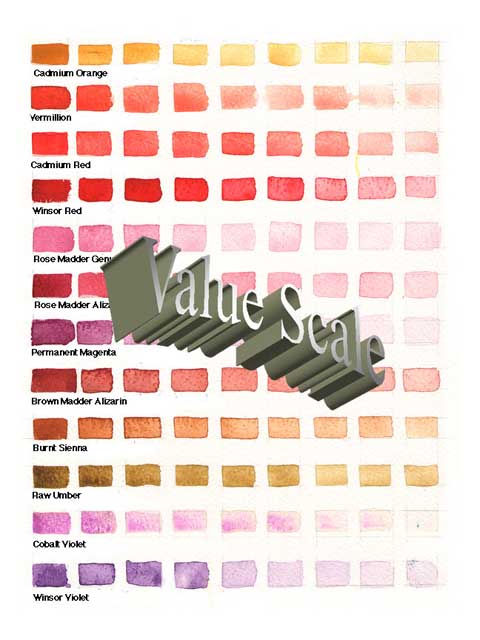
- First is the value scale. It gives the range of value (light to dark) of any particular color that you might choose from your palette.
Starting with any color on your palette. Squeeze a little out on your palette work surface. In the meantime, draw a grid of small squares or rectangles on your paper, leaving some space between the shapes in order to write in the colors you are using.
- In the top, left hand square, using a flat brush (I refer to them as chisel-edged brushes), dampen the brush a bit, blot it, then pick up some of the pure pigment on the brush, making sure that the tips of the bristles are covered evenly, and apply the color to the first square.
- Dip the brush in water, (don't swirl it around), then place it on your palette and swirl it there to mix the water with the pigment left on your brush. Apply that color to the second square.
- Dip the brush in water again, and repeat the procedure until you have filled at least 10 squares. By the time you have reached the tenth square, the color should be the palest of that pigment that you can get. Please understand that it doesn't have to be perfect. You will get the hang of it after a few tries.
Above right, I have included an example of a Value Scale that I did in one of my watercolor lessons
Now, choose another color from your palette. Repeat the instructions above in the next row of squares. You will soon learn how dark a pigment is capable of being, and how light it can be also. Remember, that we usually don't use the color "white" in watercolor, because we can get a wonderful white with just the addition of water to the pigment.

Lesson 3: Stretching Watercolor Paper>>
<< Lesson 1: Learn About Paper and Brushes
Return to Watercolor Lessons
Return to Watercolor Techniques
You can also see the 20 videos of mine on Youtube.
Return to Watercolor Painting Tips Home
|
My E-Books
Learning the Basics of Watercolor
Painting Flowers in Watercolor
Painting on Watercolor Canvas |